728x90
반응형
05 웹 쇼핑몰 : 상품조회, 등록, 수정, 삭제하기
앞에서 배운 JDBC API 를 적용하여 상품 조회 ,등록, 수정, 삭제 페이지를 만든다.
데이터베이스에 저장된 상품 목록을 가져와 출력하기
-데이터베이스 연결페이지 만들기
WebMarket/WebContent/dbconn.jsp
<%@ page contentType="text/html; charset=utf-8"%>
<%@ page import="java.sql.*"%>

<%
   Connection conn = null;//Connection 객체를 null 로 초기화하도록 작성한다.
   try {
	  //데이터베이스 이름이 포함된 URL, 사용자 계정, 비밀번호를 작성.
      String url = "jdbc:mysql://localhost:3306/WebMarketDB";
      String user = "root";
      String password = "177100";

      Class.forName("com.mysql.jdbc.Driver");//데이터베이스와 연동하기 위해 JDBC 를 로딩하도록 Class.forNames() 메소드를 작성한다.

      //DriverManager 객체로부터 Connerction 객체를 얻어오도록 getConnection () 메소드를 작성한다.
      conn = DriverManager.getConnection(url, user, password);

   } catch (SQLException ex) {
      out.println("데이터베이스 연결이 실패했습니다. <br>");
      out.println("SQLException: " + ex.getMessage());
   } catch (ClassNotFoundException ex) {
      out.println("JDBC 드라이버를 찾을 수 없습니다. <br>");
      out.println("ClassNotFoundException: " + ex.getMessage());
   }
%>
- 메뉴 페이지 수정하기
WebMarket/WebContent/menu.jsp
<%@ page contentType="text/html; charset=utf-8" %>
<nav class ="navbar navbar-expend navbar-dark bg-dark">
		<div class="container">
			<div class="navbar-header">
				<a class="navbar-brand" href="./welcome.jsp">
					Home
				</a>
			</div>
			<div>
				<ul class="navbar-nav mr-auto">
					<li class="nav-item"> <a class="nav-link" href="./products.jsp">상품 목록</a></li>
					<li class="nav-item"><a class="nav-link" href="./editProduct.jsp?edit=update"> 상품 수정</a>
				</ul>
			</div>
		</div>
	</nav>
-상품 목록 페이지 수정하기
WebMarket/WebContent/products.jsp
<%@ page contentType="text/html; charset=utf-8"%>
<%@ page import="java.sql.*" %>
<html>
<head>
<link rel="stylesheet" href="https://maxcdn.bootstrapcdn.com/bootstrap/4.0.0/css/bootstrap.min.css">
<title>상품목록</title>
</head>
<body>
<jsp:include page="menu.jsp"/>
<div class="jumbotron">
<div class="container">
<h1 class="display-3">상품 목록</h1>
</div>
</div>
<%@ include file="dbconn.jsp" %>
<div class="container">
<div class="row" align="center">
<%
PreparedStatement pstmt = null;
ResultSet rs = null;
String sql = "select * from product";
pstmt = conn.prepareStatement(sql);
rs = pstmt.executeQuery();
while (rs.next()){
%>
<div class="col-md-4">
<img src="${pageContext.request.contextPath}/resources/images/<%=rs.getString("p_fileName") %>" style="width:100%">
<h3><%=rs.getString("p_name")%></h3>
<p><%= rs.getString("p_description") %></p>
<p><%= rs.getString("p_UnitPrice") %>원</p>
<p><a href="./product.jsp?id=<%=rs.getString("p_id")%>" class="btn btn-secondary" role="button">
상세 정보 »
</a>
</div>
<%
}
if (rs != null)
rs.close();
if(pstmt != null)
pstmt.close();
if(conn != null)
conn.close();
%>
</div>
<hr>
</div>
<jsp:include page="footer.jsp"/>
</body>
</html>
데이터베이스에 새로운 상품 등록하기
-메뉴 페이지 수정하기
WebMarket/WebContent/menu.jsp
<%@ page contentType="text/html; charset=utf-8" %>
<nav class ="navbar navbar-expand navbar-dark bg-dark">
		<div class="container">
			<div class="navbar-header">
				<a class="navbar-brand" href="./welcome.jsp">
					Home
				</a>
			</div>
			<div>
				<ul class="navbar-nav mr-auto">
					<li class="nav-item"> <a class="nav-link" href="./products.jsp">상품 목록</a></li>
					<li class="nav-item"> <a class="nav-link" href="./addProduct.jsp">상품 등록</a></li>
					<li class="nav-item"><a class="nav-link" href="./editProduct.jsp?edit=update"> 상품 수정</a>
					<li class="nav-item"><a class="nav-link" href="./editProduct.jsp?edit=delete"> 상품 삭제</a>
				</ul>
			</div>
		</div>
	</nav>
-상품 등록 처리 페이지 수정하기
WebMarket/WebContent/processAddProduct.jsp
<%@ page contentType="text/html; charset=utf-8" %>
<%@ page import="com.oreilly.servlet.*" %>
<%@ page import="com.oreilly.servlet.multipart.*" %>
<%@ page import="java.util.*" %>
<%@ page import="java.sql.*" %>
<%@ include file = "dbconn.jsp" %>

<%

	request.setCharacterEncoding("utf-8");

	String filename = "";
	//String realFolder = "c:/upload"; //웹 애플리케이션상의 절대 경로
	String realFolder = "C:/Users/s/eclipse-workspace/WebMarket/src/main/webapp/resources/images";
	int maxSize = 5 * 1024 * 1024 ; // 최대 업로드될 파일의 크기 5MB
	String encType = "utf-8" ; // 인코딩 유형

	MultipartRequest multi = new MultipartRequest(request, realFolder, maxSize, encType , new DefaultFileRenamePolicy());


	String productId = multi.getParameter("productId");
	String name = multi.getParameter("name");
	String unitPrice = multi.getParameter("unitPrice");
	String description = multi.getParameter("description");
	String manufacturer = multi.getParameter("manufacturer");
	String category = multi.getParameter("category");
	String unitsInStock = multi.getParameter("unitsInStock");
	String condition = multi.getParameter("condition");


//폼페이지에서 입력된 상품 아이디 , 상품명, 가격, 설명 , 제조사, 분류, 재고수, 상품 상태 등의 값을 얻어오도록 ("요청파라미터 이름") 으로
//request 내장 객체의 getParameter()메소드를 작성한다.
	//String productId = request.getParameter("productId");
	//String name = request.getParameter("name");
	//String unitPrice = request.getParameter("unitPrice");
	//String description = request.getParameter("description");
	//String manufacturer = request.getParameter("manufacturer");
	//String category = request.getParameter("category");
	//String unitsInStock = request.getParameter("unitsInStock");
	//String condition = request.getParameter("condition");


	//폼 페이지에서 상품 가격이 입력되지 않은 경우 0 으로, 입력된 경우 정수형을 변경하도록 작성.
	Integer price ;

	if(unitPrice.isEmpty())
		price = 0;
	else
		price = Integer.valueOf(unitPrice);


	//폼 페이지에서 상품 재고수가 입력되지 않은 겨우 0 으로 입력된 경우 정수형으로 변경하도록 작성한다.
	long stock;

	if(unitsInStock.isEmpty())
		stock = 0;
	else
		stock = Long.valueOf(unitsInStock);


	Enumeration files = multi.getFileNames();
	String fname = (String)files.nextElement();
	String fileName = multi.getFilesystemName(fname);


	//데이터베이스 연동 후
	PreparedStatement pstmt = null;

	//product 테이블의 새로운 필드 값을 삽입하도록 INSERT 문을 작성한다.
	String sql = "insert into product values(?,?,?,?,?,?,?,?,?)";
	pstmt = conn.prepareStatement(sql); // PreparedStatement 객체를 생성하도록 prepareStatement() 메소드를 작성한다.

	// 폼페이지에서 전송된 상품 아이디, 상품명, 가격, 설명, 분류, 제조사, 제고 수 , 상태 , 파일명 을 위 물음표에 설정하도록 setString() 메소드를 작성한다.
	pstmt.setString(1,productId);
	pstmt.setString(2, name);
	pstmt.setInt(3, price);
	pstmt.setString(4, description);
	pstmt.setString(5, category);
	pstmt.setString(6, manufacturer);
	pstmt.setLong(7, stock);
	pstmt.setString(8, condition);
	pstmt.setString(9, fileName);
	pstmt.executeUpdate();//INSERT 문을 실행하도록 PreparedStatement 객체의 executeUpdate() 메소드를 작성한다.

	if (pstmt != null)
		pstmt.close();
	if (conn!= null)
		conn.close();

	response.sendRedirect("products.jsp");


	//(데이터베이스 연동 전)폼 페이지에서 입력된 데이터를 저장하도록 ProductRepository 클래스의 addProduct()메소드를 호출한다.
	//ProductRepository dao = ProductRepository.getInstance();


	//Product newProduct = new Product();
	//newProduct.setProductId(productId);
	//newProduct.setPname(name);
	//newProduct.setUnitPrice(price);
	//newProduct.setDescription(description);
	//newProduct.setManufacturer(manufacturer);
	//newProduct.setCategory(category);
	//newProduct.setUnitsInStock(stock);
	//newProduct.setCondition(condition);
	//newProduct.setFilename(fileName);

	//dao.addProduct(newProduct);


	//priducts.jsp 페이지로 강제 이동 하도록 response 내장 객체의 sendRedirect()메소드를 작성한다.
	//response.sendRedirect("products.jsp");


%>
데이터베이스에 저장된 상품 수정하기
-웹 애플리케이션 배포 설명자 web.xml 수정하기
JSPBook/WebContent/WEB-INF/web.xml
<web-resource-collection>
			<web-resource-name>WebMarket</web-resource-name>
			<description></description>
			<url-pattern>/addProduct.jsp</url-pattern><!-- 접근을 제한할 요청 경로를 설정 -->
			<url-pattern>/editProduct.jsp</url-pattern>
		</web-resource-collection>
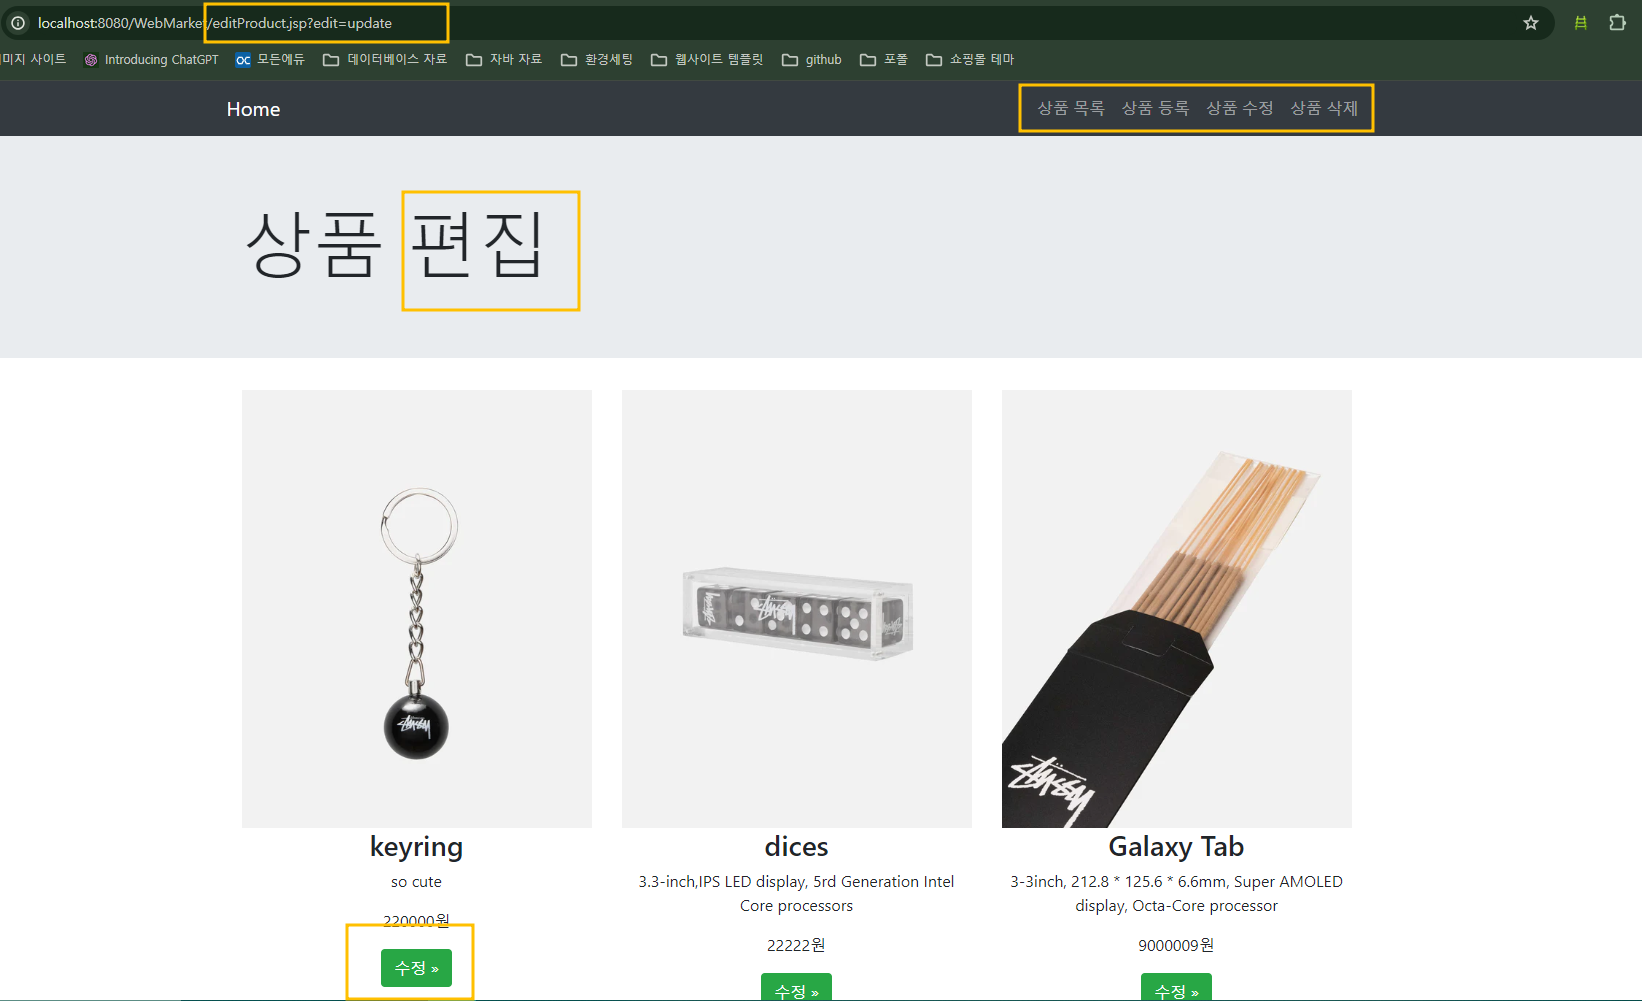
-상품 편집 페이지 작성하기
WebMarket/Webcontent/editProduct.jsp
<%@ page contentType="text/html; charset=utf-8" %>
<%@ page import="java.sql.*" %>
<html>
<head>
<link rel="stylesheet" href="https://maxcdn.bootstrapcdn.com/bootstrap/4.0.0/css/bootstrap.min.css">
<!-- 폼 페이지에 입력 항목의 데이터를 검사하는 핸들러 함수가 저장된 바바스크립트 파일 validation.js를 가져오도록 작성 -->
<title>상품 편집</title>
<script type="text/javascript">
function deleteConfirm(id){//자바스크립트로 상품 삭제 여부를 확인하는 핸들러 함수 deleteConfirn() 을 작성한다.
if(confirm("해당 상품을 삭제합니다!!") == true)
location.href = "./deleteProduct.jsp?id=" + id;
else
return;
}
</script>
<%
//요청 파라미터 edit 값을 전달받도록 request 내장 객체의 getParameter() 메소드를 작성한다.
String edit = request.getParameter("edit");
%>
</head>
<body>
<jsp:include page="menu.jsp"/>
<div class="jumbotron">
<div class="container">
<h1 class="display-3">상품 편집</h1>
</div>
</div>
<div class="container">
<div class="row" align="center">
<%@ include file="dbconn.jsp" %>
<%
PreparedStatement pstmt = null;
ResultSet rs = null;
String sql = "select * from product";
pstmt = conn.prepareStatement(sql);
rs = pstmt.executeQuery();
while(rs.next()){
%>
<div class="col-md-4">
<img src="${pageContext.request.contextPath}/resources/images/<%=rs.getString("p_fileName") %>" style="width:100%">
<h3><%=rs.getString("p_name") %></h3>
<p><%=rs.getString("p_description") %>
<p><%=rs.getString("p_UnitPrice") %>원
<p><%
if(edit.equals("update")){
%>
<a href="./updateProduct.jsp?id=<%=rs.getString("p_id") %>" class="btn btn-success" role="button">수정 »</a>
<%
} else if (edit.equals("delete")) {
%>
<!-- <삭제> 버튼을 클릭하면 핸들러 함수 deleteConfirn() 이 실행되도록 onclick 속성을 작성한다. -->
<a href="#" onclick="deleteConfirm('<%=rs.getString("p_id")%>')" class="btn btn-danger" role="button">삭제 »</a>
<%
}
%>
</div>
<%
}
if (rs != null)
rs.close();
if (pstmt != null)
pstmt.close();
if (conn != null)
conn.close();
%>
</div>
<hr>
</div>
<jsp:include page="footer.jsp"/>
</body>
</html>-상품 수정 페이지 작성하기
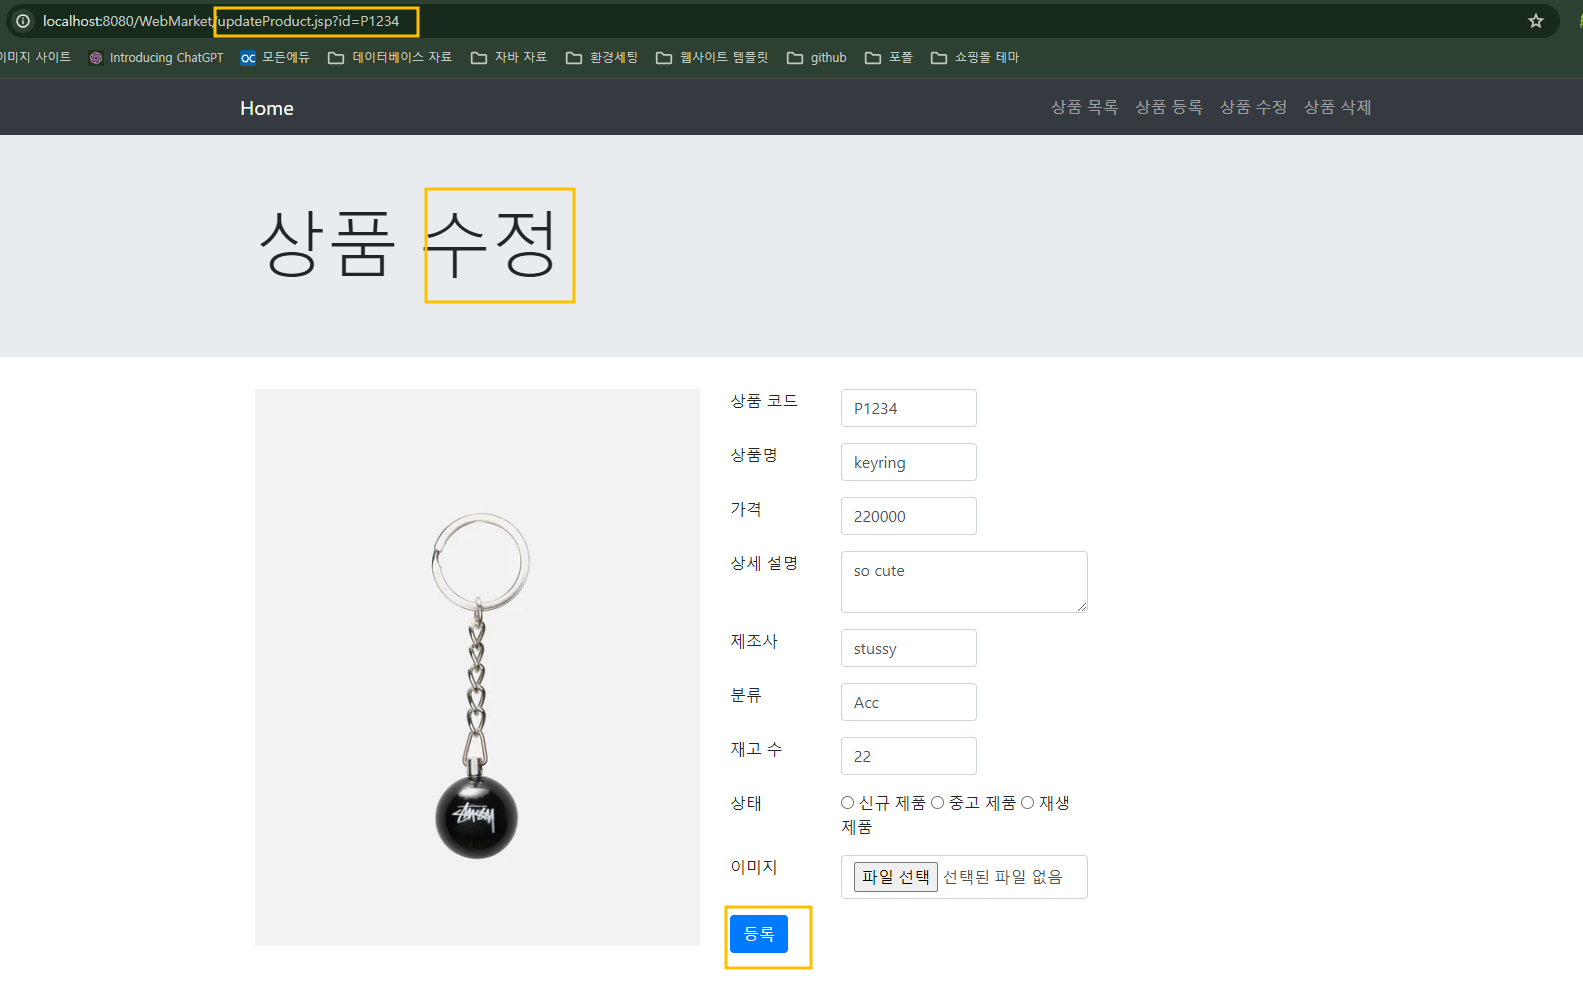
WebMarket/Webcontent/updateProduct.jsp
<%@ page contentType="text/html; charset=utf-8" %>
<%@ page import="java.sql.*" %>
<html>
<head>
<link rel="stylesheet" href="https://maxcdn.bootstrapcdn.com/bootstrap/4.0.0/css/bootstrap.min.css">
<!-- 폼 페이지에 입력 항목의 데이터를 검사하는 핸들러 함수가 저장된 바바스크립트 파일 validation.js를 가져오도록 작성 -->
<title>상품 수정</title>
</head>

<body>

	<jsp:include page="menu.jsp"/>
	<div class="jumbotron">
		<div class="container">
			<h1 class="display-3">상품 수정</h1>
		</div>
	</div>
			<%@ include file="dbconn.jsp" %>
			<%

				String productId = request.getParameter("id");

				PreparedStatement pstmt = null;
				ResultSet rs = null;

				String sql = "select * from product where p_id = ?";//product 테이블에서 p_id 필드 값과 일치하는 값을 가져오도록 SELECT 문을 작성한다.
				pstmt = conn.prepareStatement(sql);//PreparedStatement 객체를 생성하도록 prepareStatement() 메소드를 작성한다.
				pstmt.setString(1, productId);//요청 파라미터 id 의 값을 위행의 물음표에 설정하도록 setString() 메소드를 작성한다.
				rs = pstmt.executeQuery();//SELECT 문ㄴ을 실행하도록 PreparedStatement 객체의 executeQuery() 메소드를 작성한다.


				//SELECT 문으로 가져온 레코드에 대해 p_id, p_name, p_unitPrice, p_description, p_manufacturer, p_category, p_unitInStock 필드 값을 가져와 출력하도록 작성한다.
				if(rs.next()){

			%>
			<div class="container">
				<div class="row">
					<div class="col-md-5">
						<img src="${pageContext.request.contextPath}/resources/images/<%=rs.getString("p_fileName") %>" style="width:100%">
					</div>
					<div class="col-md-7">
						<form name="newProduct" action="./processUpdateProduct.jsp" class="form-horizontal" method="post" enctype="multipart/form-data">
							<div class="form-group row">
								<label class="col-sm-2">상품 코드</label>
								<div class="col-sm-3">
									<input type="text" id="productId" name="productId" class="form-control" value="<%=rs.getString("p_id")%>">
								</div>
							</div>
							<div class="form-group row">
								<label class="col-sm-2">상품명</label>
								<div class="col-sm-3">
									<input type="text" id="name" name="name" class="form-control" value="<%=rs.getString("p_name")%>">
								</div>
							</div>
							<div class="form-group row">
								<label class="col-sm-2">가격</label>
								<div class="col-sm-3">
									<input type="text" id="unitPrice" name="unitPrice" class="form-control" value="<%=rs.getString("p_unitPrice")%>">
								</div>
							</div>
							<div class="form-group row">
								<label class="col-sm-2">상세 설명</label>
								<div class="col-sm-5">
									<textarea name="description" cols="50" rows="2" class="form-control" ><%=rs.getString("p_description")%></textarea>
								</div>
							</div>
							<div class="form-group row">
								<label class="col-sm-2">제조사</label>
								<div class="col-sm-3">
									<input type="text" id="manufacturer" name="manufacturer" class="form-control" value="<%=rs.getString("p_manufacturer")%>">
								</div>
							</div>
							<div class="form-group row">
								<label class="col-sm-2">분류</label>
								<div class="col-sm-3">
									<input type="text" id="category" name="category" class="form-control" value="<%=rs.getString("p_category")%>">
								</div>
							</div>
							<div class="form-group row">
								<label class="col-sm-2">재고 수</label>
								<div class="col-sm-3">
									<input type="text" id="unitsInStock" name="unitsInStock" class="form-control" value="<%=rs.getString("p_unitsInStock")%>">
								</div>
							</div>
							<div class="form-group row">
								<label class="col-sm-2">상태</label>
								<div class="col-sm-5">
									<input type="radio" name="condition" value="New"> 신규 제품
									<input type="radio" name="condition" value="Old"> 중고 제품
									<input type="radio" name="condition" value="Refurbished"> 재생 제품
								</div>
							</div>
							<div class="form-group row">
								<label class="col-sm-2">이미지</label>
								<div class="col-sm-5">
									<input type="file" name="productImage" class="form-control">
								</div>
							</div>
							<div class="form-group row">
								<div class="col-sm-offset-2 col-sm-10">
									<input type="submit" class="btn btn-primary" value="등록"><!-- <등록> 버튼을 작성한다.  -->
								</div>
							</div>
						</form>
					</div>
				</div>
			</div>
			<%
				}
				if( rs != null)
					rs.close();
				if( pstmt != null)
					pstmt.close();
				if( conn != null)
					conn.close();

			%>

</body>
</html>
-상품 수정 처리 페이지 작성하기
WebMarket/Webcontent/processUpdateProduct.jsp
<%@ page contentType="text/html; charset=utf-8" %>
<%@ page import="com.oreilly.servlet.*" %>
<%@ page import="com.oreilly.servlet.multipart.*" %>
<%@ page import="java.util.*" %>
<%@ page import="java.sql.*" %>
<%@ include file = "dbconn.jsp" %>

<%

	String filename = "";
	String realFolder = "C:/Users/s/eclipse-workspace/WebMarket/src/main/webapp/resources/images"; // 웹 애플리케이션상의 절대경로
	String encType = "utf-8"; //인코딩 유형
	int maxSize = 5 * 1024 * 1024 ; //최대 업로드될 파일의 크기 5MB

	MultipartRequest multi = new MultipartRequest(request, realFolder, maxSize, encType, new DefaultFileRenamePolicy());
	String productId = multi.getParameter("productId");
	String name = multi.getParameter("name");
	String unitPrice = multi.getParameter("unitPrice");
	String description = multi.getParameter("description");
	String manufacturer = multi.getParameter("manufacturer");
	String category = multi.getParameter("category");
	String unitsInStock = multi.getParameter("unitsInStock");
	String condition = multi.getParameter("condition");

	Integer price;

	if (unitPrice.isEmpty())
		price = 0;
	else
		price = Integer.valueOf(unitPrice);

	long stock;

	if (unitsInStock.isEmpty())
	//if (unitsInStock == null || unitsInStock.isEmpty())
	//if (unitsInStock == null)
		stock = 0;
	else
		stock = Long.valueOf(unitsInStock);

	Enumeration files = multi.getFileNames();
	String fname = (String) files.nextElement();
	String fileName = multi.getFilesystemName(fname);

	PreparedStatement pstmt = null ;
	ResultSet rs = null ;

	//product 테이블에서 p_id 필드 값과 일치하는 값을 가져오도록 SELECT 문을 작성한다.
	String sql = "select * from product where p_id = ?";

	//PreparedStatement 객체를 생성하도록 prepareStatement() 메소드를 작성한다.
	pstmt = conn.prepareStatement(sql);

	//요청 파라미터 id의 값을 44행의 물음표에 설정하도록 setString() 메소드를 작성한다.
	pstmt.setString(1, productId);

	//SELECT 문을 실행하도록 PreparedStatement 객체의 executeQuery() 메소드를 작성한다.
	rs = pstmt.executeQuery();


	//SELECT 문으로 가져온 레코드가 있으면 실행한다.
	if (rs.next()){
		if(fileName != null) {//요청 파라미터중에서 이미지파일이 있으면 실행한다.

			//product 테이블에서 p_id 필드 값과 일치하는 값이 있으면 해당 레코드를 수정하도록 UPDATE 문을 작성한다.
			sql = "UPDATE product SET p_name=?, p_unitPrice=?, p_description=?, p_manufacturer=?, p_category=?, p_unitsInStock=?, p_condition=?, p_fileName=? WHERE p_id=?";

			//PreparedStatement 객체를 생성하도록 prepareStatement() 메소드를 작성한다.
			pstmt = conn.prepareStatement(sql);

			//요청 파라미터의 값을 UPDATE 문에 있는 물음표에 설정하도록 setXxx() 메소드를 작성한다.
			pstmt.setString(1, name);
			pstmt.setInt(2, price);
			pstmt.setString(3, description);
			pstmt.setString(4, manufacturer);
			pstmt.setString(5, category);
			pstmt.setLong(6, stock);
			pstmt.setString(7, condition);
			pstmt.setString(8, fileName);
			pstmt.setString(9, productId);

			//UPDATE 문을 실행하도록 PreparedStatement 객체의 executeUpdate() 메소드를 작성한다.
			pstmt.executeUpdate();

		} else{// 요청 파라미터중에서 이미지 파일이 없으면 실행한다.

			//product 테이블에서 p_id 필드 값과 일치하는 값이 있으면 해당 레코드를 수정하도록 UPDATE 문을 작성한다.
			sql = "UPDATE product SET p_name=?, p_unitPrice=? , p_description=?, p_manufacturer=?, p_category=?, p_unitsInStock=?, p_condition=? WHERE p_id=?";

			//PreparedStatement 객체를 생성하도록 prepareStatement() 메소드를 작성한다.
			pstmt = conn.prepareStatement(sql);

			//요청 파라미터의 값을 UPDATE 문에 있는 물음표에 설정하도록 setXxx() 메소드를 작성한다.
			pstmt.setString(1, name);
			pstmt.setInt(2, price);
			pstmt.setString(3, description);
			pstmt.setString(4, manufacturer);
			pstmt.setString(5, category);
			pstmt.setLong(6, stock);
			pstmt.setString(7, condition);
			pstmt.setString(8, productId);

			//UPDATE 문을 실행하도록 PreparedStatement 객체의 executeUpdate() 메소드를 작성한다.
			pstmt.executeUpdate();

		}
	}
	if (rs != null)
		rs.close();
	if (pstmt != null)
		pstmt.close();
	if (conn != null)
		conn.close();

	response.sendRedirect("editProduct.jsp?edit=update");

%>
728x90
반응형
'JSP, Servlet, MySQL > JSP - webmarket' 카테고리의 다른 글
| JSP Servlet JSP 표준 태그 라이브러리 : 회원가입, 수정, 탈퇴하기 (0) | 2024.03.11 |
|---|---|
| JSP Servlet JDBC로 데이터베이스와 JSP 연동 : 상품 조회, 등록, 수정, 삭제하기 5 (0) | 2024.03.07 |
| JSP Servlet JDBC로 데이터베이스와 JSP 연동 : 상품 조회, 등록, 수정, 삭제하기 3 (1) | 2024.03.01 |
| JSP Servlet JDBC로 데이터베이스와 JSP 연동 : 상품 조회 , 등록, 수정, 삭제하기 2 (0) | 2024.02.28 |
| JSP Servlet JDBC로 데이터베이스와 JSP 연동 : 상품조회, 등록, 수정, 삭제하기 (1) | 2024.02.25 |
